Cara Mengedit Membuat Map Sendiri UK Truck Simulator (UKTS) Euro Truck Simulato (ETS) myspacenote.blogspot
Copyright © 2010 Dave “Crockett” Jackson. All rights reserved
Adding ports to your map
I’m sure by now we recognise what the prefabs pictured below are, but can you tell the difference between them?
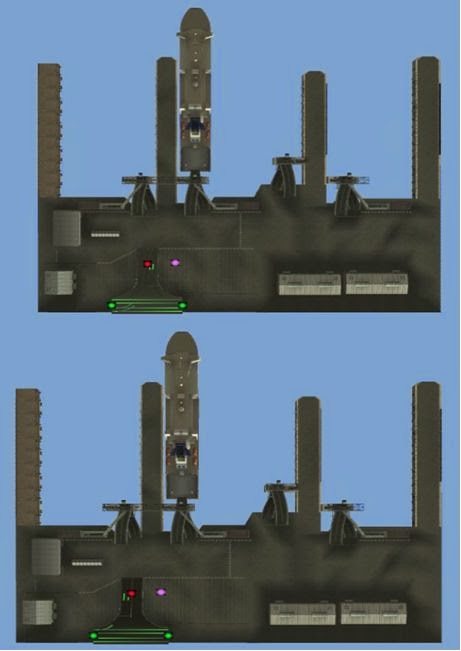

The difference between them is simple, the top prefab is for left hand lane (UK) traffic and the bottom one is right hand lane (Europe) traffic, when adding a port to your map, ensure you use the correct prefab, they are easy to identify, the left hand lane traffic port has a uk suffix where the other one doesn’t, now, let’s place the port prefab into your map and
configure it for correct use. Press e then 2, press alt+tab to switch focus to the prefab properties window and from the drop down list select the correct port prefab and set the origin to either 1 or 2 so that the red operator node is on one end of the junction where the approach road meets the prefab and not within the port as shown in the pictures, move the mouse to the position you want the prefab to be placed then left mouse click to place the prefab. Now, we need to configure the port to make it operational, we do this by first adding an overlay to the port, because there is no shortcut to the map overlay, you will need to press e then click on the current item type and select map overlay, you will also see a “Ferry” option there, we will use this in a moment. Now go back to the editor and left click at the bottom of the ramp into the port, a purple node will appear where you have just clicked, press p then left click the purple node, press alt+tab to switch focus to the overlay properties window (as shown below) and from the drop down list, you need to select “Harbor” then click OK.

Now, press e and click on the current item type and select “Ferry” (do the following for both ports)
Zoom into the ferry and left click approximately one third into the ship, now press c and move the camera to focus on the purple node you have
just placed, you should see something like this:


Adding declarations to configuration files
Open base and copy the directory def/economy/ferry into project. Now, look inside the ferry directory and you will see some .sii files, open one of these, it will look something like this:
ferry_data: ferry.uk.hull(if you are using GTS or UKTS you won’t need the uk prefix)
{
name: "@@ui_hull@@ -> @@ui_zeebrugge@@" price: 425
time: 655
connection : ferry.uk.zeebrugge
}
Change the ferry data to the name of your starting port (eg ferry.uk.felixstowe) and change the names to the names of your starting
and destination ports
(eg name: “@@ui_felixstowe@@ -> @@ui_rotterdam@@”)
Now, change the price to reflect the price you want and also change the time to reflect how much time should elapse before reaching the
destination ferryport. Also change the connection to the name of your destination ferryport (eg connection: ferry.uk.rotterdam) HINT if using ETS, define all your ferryports as uk ferryports, it saves time and makes it
less confusing!)
Now save the file into your project/def/economy/ferry directory giving the file the name of your ferryport (eg Felixstowe.sii) while the file is still
open, swap round the names of the ferryports so that where Felixstowe was Rotterdam now is and vice versa and save the file as Rotterdam.sii You have now finished declaring your ferry ports for the route you have
built into your map, you now need to go back to the editor and head for your starting port, press p and left click on the purple ferry node, then press alt+tab to switch focus to the ferry properties window which looks like this:

click OK, do the same for your destination port. Once this is done, congratulations! You have now planned and configured your first ferry
route! Follow the same process for any other routes you want.
Creating approach roads
You create approach roads for the ferry port in the same way you would create ordinary roads but you will need to adjust the height of the road as it approaches the ferry port so that the outer fences of the ferryport do not cut into your road, you should also define the last part of your approach
roads as bridges as it comes into connection with the prefab’s junction, this gives a much neater finish to the port. It would also be a good idea to add some water terrain to the ship area of the port, simply press e then 1
and from the road properties window, click terrain and draw a road string in the normal manner but change the grass to water (ocean) in the road item properties window in the usual manner. This will give your port a
much more realistic feel.
Copyright © 2010 Dave “Crockett” Jackson. All rights reserved
Part 1 Part 2 Part 3 Part 4 Part 5 Part 6 Part 7

Merit Casino Review - Online casinos with good bonus codes
ReplyDeleteBest online casinos with Merit Casino: ✓No deposit bonus ✓Signup bonuses ✓Payout speed ✓Casino games. งานออนไลน์ Rating: deccasino 3 · Review by Marcela Maniscalco 샌즈카지노